Mushrooms and toadstools change as they age, so it can be difficult to identify them. Honey fungus can kill garden plants. Here’s how to check if a mushroom is likely to be honey fungus.
By The RHS Advice Team
Quick facts
Colour honey-beige-brown
1
Pale gills
2
Pale spore print
3
Typically stem of constant thickness along its length (Armillaria gallica can be bulbous)
4
Grows in clumps
5
Grows near a source of dead or dying (and sometimes apparently healthy) plant material
Fungi have multiple structures. Mushrooms/toadstools are their fruiting bodies. These carry spores (the fungal equivalent of seeds). If you suspect a mushroom is honey fungus, inspecting its features and making a spore print will help you distinguish it from the many other orange-brown mushrooms that may grow in the garden but are harmless to living plants.
Honey fungus mushrooms only appear in the autumn and do not appear every year, but when they do occur it could be a sign that the plant is dying or already dead. Early indications from ongoing RHS research suggest that spores from the mushrooms of Armillaria mellea, the aggressive honey fungus species found most commonly in gardens, are more important in spreading the fungus than previously thought. The variability found between samples of the fungus taken from different areas of the garden at RHS Wisley indicates that many of the initial infections arose from spores (although once established in a particular area the fungus will still then spread between adjacent plants via rhizomorphs or root-to-root contact).
There are other features of honey fungus infection that you can check all year round. White sheets of fungal mycelium grow under the of roots and stem-bases, plus black rhizomorphs (aka bootlaces) grow on root surfaces, under the bark, and in the soil.
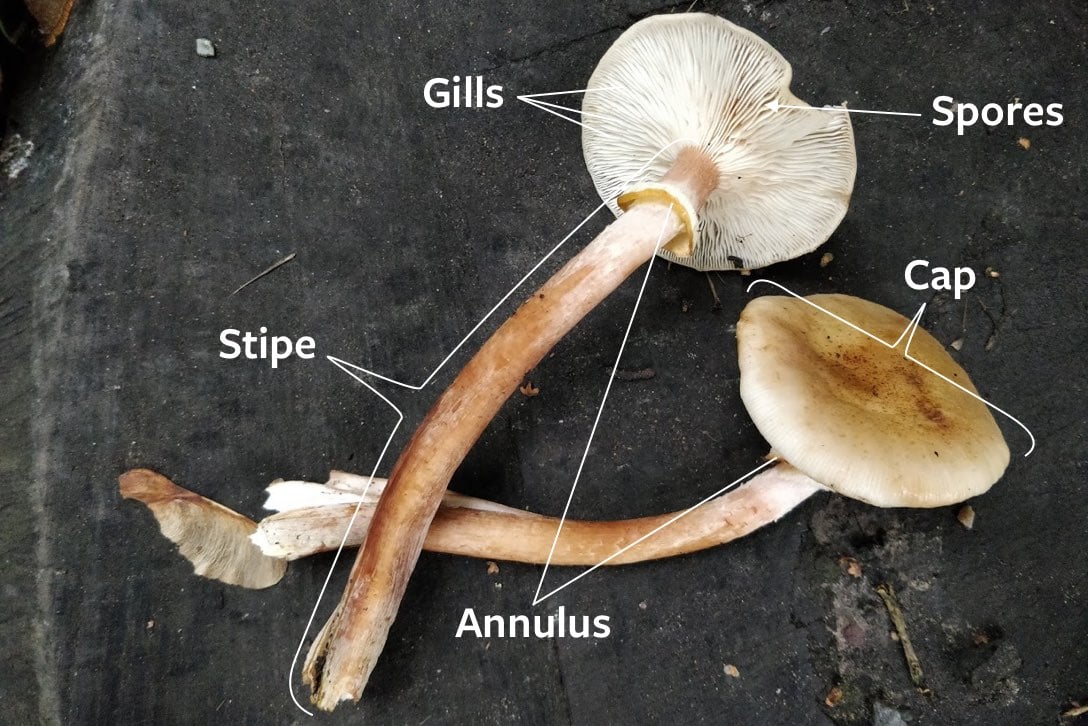
Features of a honey fungus mushroom
Cap – Honey-beige-brown in colour, usually smooth in texture on the upper surface but can be somewhat fluffy.
Gills – Membranes running radially across the underside of the cap are the gills. Honey fungus gills are pale. Some but not all of the gills will run all the way from the cap edge to connect to the central stalk (stipe).
Spores – Spores develop and are released from between the gills. The colour of the spores may be hard to tell while still inside the mushroom cap, but by making a spore print (see below) you can observe the colour more easily. Honey fungus mushrooms produce pale (white/cream) spores.
Annulus – A ring of tissue around the stalk (stipe). The species of honey fungus that occur in gardens all have annuli close to where the cap begins, but these can be difficult to spot and may only be present as wispy veils of tissue.
Stipe – The stalk is called the stipe. In most honey fungus mushrooms the stipe is the same width along its length (Armillaria gallica can have a bulbous base). The colour and patterning of the stipe vary, ranging from pale/pinkish/dark brown in colour, and smooth/stripy/scaled in pattern. The stipe is often hollow in the middle.
1
of
4
Side-on view of honey fungus mushrooms growing in a clump next to their food source, showing the annulus (ring) and pale gills
of
Older mushrooms have become darker and may not work as well in a spore print
of
Viewing mushrooms from underneath, note how the annulus (ring) is easier to spot in some samples compared to others
of
White dusting between layers of honey fungus mushroom caps growing together in a clump, formed by the pale spores falling from the mushrooms above
How to make a spore print
Equipment required:
Mushrooms
Scissors
Gloves
Black paper
White paper
Glass beaker
1) Pick your mushroom Choose the freshest mushroom you can. Young mushrooms may be too immature to drop their spores, whereas old mushrooms may have already released all their spores. Young specimens of honey fungus look like button mushrooms, then uncurl as they age before turning dark and slimy once they are past their peak. Wear gloves when handling unknown mushrooms, or make sure to wash hands afterwards.
2) Lay out the materials Cut the stipe (stem) off as close to the base of the cap as possible. Position the black and white paper on a flat surface where it can be left undisturbed for several hours. Place the mushroom, gills facing down, over both colours of paper (either cut the mushroom in half and place separately on the two sheets, or put the sheets side by side and place the mushroom so half rests over each colour).
3) Incubate Cover the mushroom cap with a glass beaker and allow to rest for 3+ hours to allow as many spores as possible to fall from the mushroom’s gills.
4) Check the results Carefully lift the beaker and cap from the paper. If the print has been successful there will be spores visible on the sheets below. Make a note or take a photograph of the colour observed.
Honey fungus mushrooms release pale spores which are visible against a black background. In clumps of honey fungus mushrooms a white dusting on the tops of shorter mushrooms is caused by spore deposits from the caps above them. The precise colour of these spores can be white-cream and spores darken as they dry.
Seeking advice
If you are an RHS member and you still unsure if you have correctly identified a honey fungus infection in your garden, send samples or photographs to RHS Gardening Advice for confirmation. To ensure you provide enough information for a successful identification, please send us:
A photograph from the top, side and underside of the mushrooms
A photograph showing the location where the mushrooms are growing
Results of the spore print (by photography or description)
The RHS helps members with pathogenic fungi only, ie those that cause plant disease. We are unable to help in the identification of saprotrophic fungi (non-harmful, decay fungi), neither can we confirm if such fungi are edible.