Chip budding is one of the easier forms of grafting. A bud, rather than a shoot, is attached to a rootstock to make a new plant. With practice, this technique can be mastered by anyone and, as just one bud is needed to make a tree, it is very efficient.
By The RHS Advice Team
Quick facts
Suitable for - Trees, especially rose family plants (Rosaceae)
Chip budding is often used for fruit and ornamental, trees. Trees in the rose family such as apple, cherries, hawthorn, pear, plums and Sorbus are especially amenable to chip budding. Acers, Laburnum, Magnolia and Robinia are other trees frequently budded.
For chip budding, a on a sliver of wood, complete with is inserted into a matching notch on the rootstock.
When to chip bud
Chip budding is carried out between mid-summer and early autumn. This is an advantage over T-budding which can only be carried out in mid-summer.
How to chip bud
Before you start, you need to choose a rootstock (the plant you will be propagating onto). Rootstocks can often be bought from rootstock growers and nurseries that specialise in the type of plant in question. Alternatively, they can be raised from seed or .
Choose a rootstock with desirable characteristics; such as a dwarfing habit that makes fruit trees more compact, or a rootstock that resists root diseases, or one that is easier to propagate than the (top part of the budded tree).
From mid-summer choose the buds you wish to chip , by selecting non-flowering shoots that are a similar diameter to the rootstock, from well-ripened, current season’s growth. Remove these 'budsticks' from the parent plant so that they can be budded onto the rootstock.
To prepare the rootstock, cut off all shoots and leaves from the bottom 30cm (1ft) of stem.
To prepare the ‘budstick’, remove the soft, fleshy, tip growth and remove all leaves with knife or secateurs, leaving 3-4 mm (1/8in) stubs of leaf stalk.
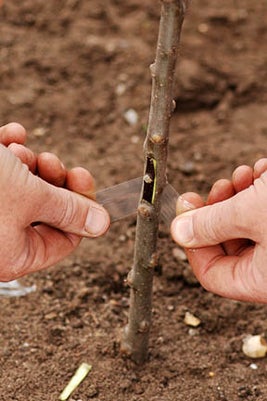
Using a clean, very sharp knife make a cut 2cm (¾in) below a bud, inserting the blade about 5mm (¼in) deep at an angle of 30 degrees.
Make a second cut about 4cm (1½in) above the first. Cut down through the wood to meet the first cut, taking care not to damage the bud.
Then immediately make two cuts in the rootstock about 15cm (6in) from the ground to exactly correspond with those on the bud chip and remove the resulting sliver of wood.
Place the bud chip into the ‘lip’ of the cut rootstock so that the cambium layers match as exactly as possible. Bind the join tightly with tape or strips of polythene taken from a plastic bag, leaving the bud and leaf stalk exposed.
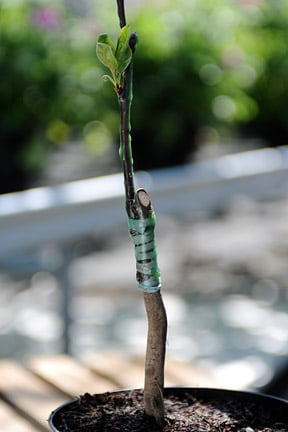
The tape can be removed once the bud starts to swell. Insert a and tie in the new shoot as it develops.
The following spring, cut back the stock just above the bud. Plant out the following winter after the bud has grown into a new tree.
Problems
Failure of buds to take usually results from not cutting accurately enough to get the cambium layers to match. Practise on spare shoots until a really good match can be reliably cut. Some less experienced gardeners like to attach several buds as at least one should take. The RHS, horticultural colleges and others offer budding courses and these are strongly recommended.
Knowing when to remove the ties can be difficult; the bud and the cambium must have united and this is indicated by swelling of the budded part of the stem.