Getting Started
Jerusalem artichokes are easy to grow and need little maintenance. They are a type of sunflower, producing crops of underground tubers for harvesting in late autumn and winter. They can also be grown in large containers if you’re short on ground space.
Jerusalem artichokes (Helianthus tuberosus) are grown from tubers rather than seeds, in a similar way to potatoes, yet unlike potatoes they are very hardy. After harvesting, if you leave a few in the ground, either on purpose or by accident, they’ll sprout in spring and produce another crop by late autumn.
Despite their name, Jerusalem artichokes originate from North America. It is believed the term ‘Jerusalem’ has evolved from the Italian word girasole, meaning sunflower. They are often called sunchokes in the US, and although they grow well in full sun, they will also crop in partial shade. They are in the same family (Asteraceae) as globe artichokes, but the two vegetables have little else in common.
As Jerusalem artichokes are relatively expensive to buy in the shops, but extremely easy to grow, they’re a useful and cost-effective crop. The tubers can be lifted over a long period, after many other crops have finished, providing valuable winter harvests.
Jobs to do now
Earth up around stems
Water in dry spells
Month by Month
Plant
Harvest


Choosing What To Grow
Jerusalem artichokes are grown from tubers, not seeds. Only a few varieties are sold commercially in the UK, and tubers are generally available from late winter to mid-spring from garden centres and online suppliers. Plants can reach a height of 3m (10ft), so the variety ‘Dwarf Sunray’ is a good choice for exposed sites, as plants only grow about 120-150cm (4-5ft) tall. You can also plant healthy tubers bought in supermarkets or greengrocers.
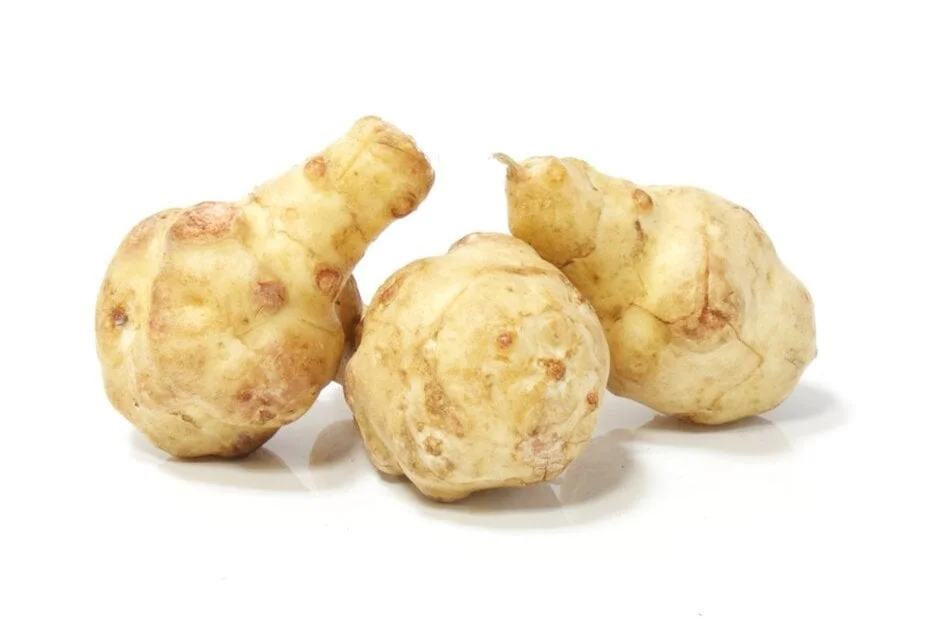
Select firm, smooth tubers to plant, ideally slightly smaller than a hen's egg. After your first year of growing Jerusalem artichokes, you can simply replant some of your harvested tubers every year, or just leave some in the ground to re-grow.
Recommended Varieties

‘Dwarf Sunray’
A shorter variety, only about 120-150cm (4-5ft) tall, with long, smooth, pale tubers.

Preparing The Ground
For a good crop, select a sunny planting site with moderately fertile, moisture-retentive soil, but avoid planting in ground that can become , as the tubers may rot. Fork in a bucketful of well-rotted organic matter, such as garden compost, per square metre/yard before planting. Alternatively, if you're practicing no-dig, the soil with organic matter ahead of planting directly into the mulch.
Jerusalem artichokes will tolerate less than favourable conditions, such as poor soils and partial shade, but you are likely to get a smaller crop of tubers.
Planting
Jerusalem artichokes can grow very tall (up to 3m/10ft), so when choosing a planting site, make sure they won’t cause problems overshadowing other crops nearby. They may need support in exposed locations, but can act as a useful windbreak if you plant several rows.
Planting in the ground
Choose and prepare your planting site as detailed above. Then plant the tubers 10-15cm (4-6in) deep and 30cm (1ft) apart, in rows or staggered rows. If you need access between the rows, space them at least 1m (3ft) apart. Alternatively, rows can be spaced as close together as 30cm (1ft) to create a block of plants.
To produce more plants, you can cut large tubers in half – just make sure there is at least one on each piece. Water them in well after planting.
Planting in containers
If your soil isn't ready for planting in late winter/early spring, due to it being frozen, too wet or unprepared, you can start the tubers off in pots outdoors. Then transplant the young plants into the ground in late spring.
Alternatively, you can grow the crop entirely in a large pot. Compact varieties are a good choice for container growing. The container should be at least 45cm (18in) wide and deep, to accommodate one or two tubers, planted 10-15cm (4-6in) deep. Use peat-free multi-purpose . Place the container in a sheltered spot, in sun or partial shade. Bear in mind that plants in containers need regular watering, especially in hot weather, and are likely to produce a smaller crop than in the ground.
Plant Care
Jerusalem artichokes are strong, vigorous plants and need little maintenance. However, they do benefit from watering during dry spells and will need supporting/staking unless they're in a sheltered spot or you're growing a compact variety.
Watering
Water regularly during dry spells in summer, to ensure the tubers swell. Lack of water may lead to smaller, more knobbly tubers that are fiddly to prepare in the kitchen. Plants in containers need regular watering throughout the .
Mulching
Mulch the soil in late winter or spring, after planting your tubers, using well-rotted organic matter, such as garden compost. This helps hold moisture in the ground and suppress weeds.
Supporting
When the stems are about 30cm (1ft) tall, draw up a mound of soil around the base, about 15cm (6in) high, to help stabilise the plants as they grow. In windy sites, insert tall supports (bamboo canes, hazel or other woody stems) around the outside of plantings and use garden or string to contain the growth. Good support helps to prevent wind-rock, which can loosen the tubers in the ground and reduce their growth. Strong winds can potentially cause stems to break or topple over.
Alternatively, you can cut tall stems down to about 1.5m (5ft) in late July or August (also removing the flowers, see below). Don’t reduce their height any more than that though, as it could lead to a smaller crop of tubers.
Removing flowers

These sunflower relatives produce cheery yellow blooms at the tops of their tall stems in late summer and autumn. The flowers add welcome colour to the veg plot and provide food for pollinators. However, you may prefer to remove the flowers, as doing so will allow plants to put more energy into swelling their tubers, resulting in a better crop.
Overwintering
Tubers are hardy and can be left in the ground all winter, for harvesting whenever needed. In colder regions, cover the ground with the cut stems, a thick mulch, or other insulation such as cardboard, to deter freezing, so you can still dig them up during very cold spells. The tubers don’t store well indoors, so are best kept in the ground until needed.
Propagating
Save some of the best, smoothest tubers from your harvest and replant them, for a crop the following year. Alternatively, just leave a few in the ground if you’re happy to let them continue growing in the same spot.
Pruning And Training
On exposed sites, if staking isn't in place, it’s best to prune all stems down to 1.5m (5ft) in late summer, to prevent wind damage.
When the leaves start to turn yellow in autumn, cut down the stems to about 8cm (3in) tall. Leave the stumps as useful indicators of where the tubers are. Place the prunings over the cut stems to keep the soil warm and make it easier to dig up the tubers in frosty weather.
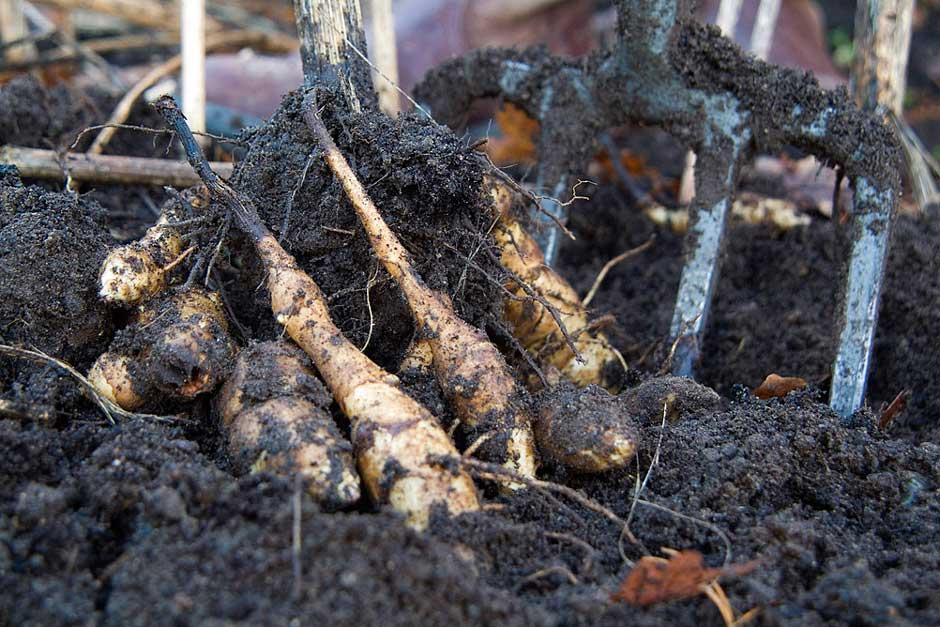
Harvesting
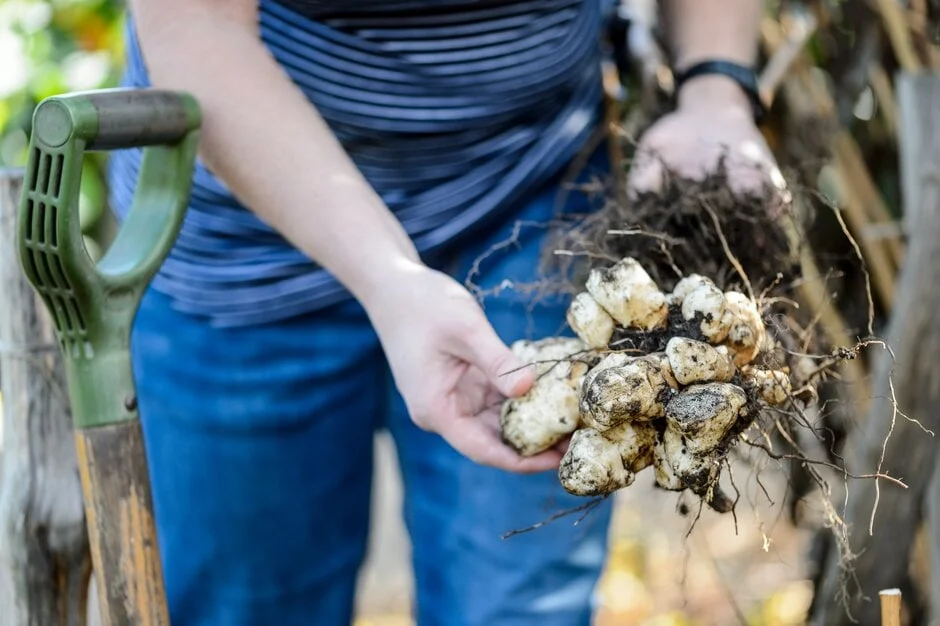
Plants should generally produce 10 or more tubers each, to harvest from late autumn onward. Dig them up with a garden fork as required. They don’t generally store well once harvested, so leave them in the ground until needed, right through winter if necessary. They won’t turn woody, and frost is said to improve the flavour. New plants will grow from any tubers left in the soil, so if you don’t want them coming back the following year, make sure you remove every last piece. In light soil, the tubers can go quite deep and spread out wide.
The tubers have a nutty flavour and can be used in the same way as potatoes. Depending on how smooth they are, you can peel them before or after cooking, or, if thin skinned, not at all. Jerusalem artichokes contain a carbohydrate that isn’t broken down during digestion and can cause wind, especially if you eat a lot at one time. Try eating small quantities to start with, to see how you react. Cooking them in lemon juice may prevent this side-effect, as may harvesting late in the season – it’s worth experimenting to see what works best for you.
Problem Solving
Jerusalem artichokes are healthy, robust plants that rarely suffer serious problems. Slugs and snails may nibble new shoots, but don’t cause significant damage to older growth. They may also eat into the tubers, especially over winter.
Common Problems

Sclerotinia disease
Sclerotinia disease is a fungal infection of many vegetables and ornamental plants. The fungus survives for long periods in the soil. When infected, p...

Slugs and snails
Slugs and snails are common garden animals, and they are well suited to the damp, mild climate of the UK. A few species feed on garden plants, but mos...
