Getting Started
Shallots are easy to grow from immature known as sets, and can also be grown from seed. Planted in a warm sunny location, they’ll produce a good crop of bulbs that can be stored for many months.

Shallots (Alliumcepa Aggregatum Group) are a type of small, sweet onion, and are just as easy to grow, with a similar need for a sunny position and free-draining soil. To grow from sets, plant outdoors in spring, autumn or winter, and they’ll produce a cluster of new bulbs to harvest in summer. They can also be grown from seed, which takes a little more time and effort.
Jobs to do now
Water if needed
Month by Month
Sow
Plant
Harvest


Choosing What To Grow
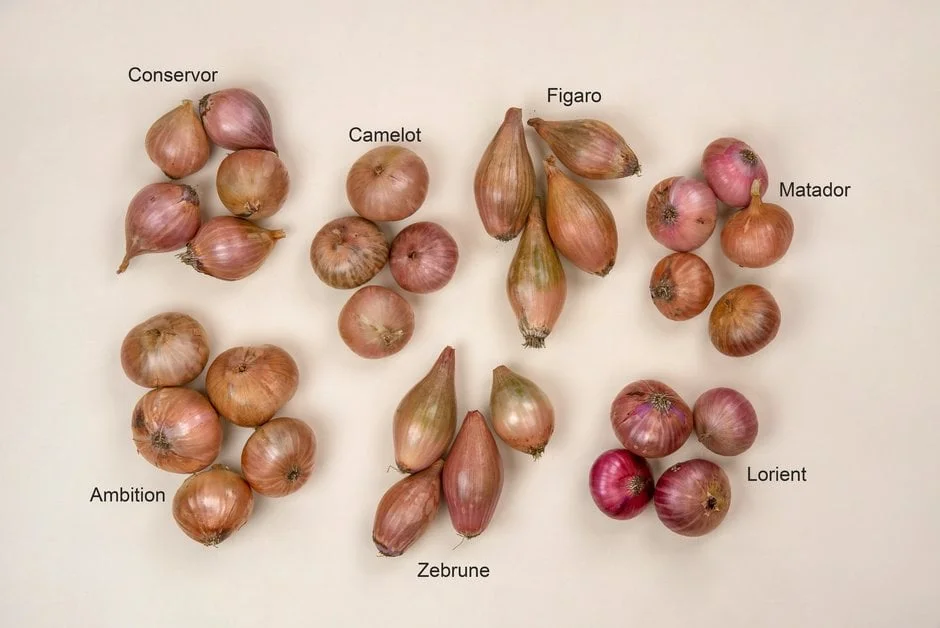
There are many shallot varieties to choose from, producing of various shapes, colours and sizes, with different flavours and levels of sweetness. Bulbs can be rounded, teardrop-shaped or elongated. Some varieties store particularly well, others may be resistant to disease or bolting. Varieties with an RHS Award of Garden Merit (AGM) are a good choice and should produce a reliable crop – see our list of AGM fruit and veg (135kB pdf) – shallots are listed under onions, and our Recommended Varieties below.
Sets or seeds?
Shallots can be started from seed, but are more usually grown from sets (immature ). Each set produces a cluster of new bulbs, whereas a seed produces just one. Sets are the easier option, they are quicker to grow and generally fare better in colder regions. However, they are more expensive and must be planted soon after buying. Choose heat-treated sets to reduce the risk of bolting (premature flowering).
Seeds, on the other hand, are usually much cheaper to buy. Seed-raised plants are less likely to bolt, but grow more slowly and need more attention in the early stages.
What and where to buy
Shallot sets are generally available in spring, autumn and winter in garden centres and from online retailers. Seeds are usually available from similar sources all year round. You may also find young plants on sale in garden centres in spring and early summer, ready for planting out – ideal if you only want a few.
Recommended Varieties


'Longor' AGM
An elongated banana-type. Each set produces up to eight shallots. Stores well.


Preparing The Ground
To produce a good crop, shallots need a sunny site with fertile, well-drained soil. Shallots have a limited root system, so improving the soil with organic matter before sowing or planting is invaluable – fork in a bucketful of well-rotted (not fresh) manure or garden per square metre/yard. This improves the soil structure and helps to hold moisture in the soil. Alternatively, if you're practicing no-dig gardening, the soil with organic matter ahead of sowing or planting directly into the mulch.
Avoid growing in damp soil, as this makes the crop prone to rotting and fungal diseases. If your soil isn't free-draining, consider growing shallots in raised beds or containers. Shallots generally don’t do well in growing bags.
Sowing
Although shallots are usually grown from sets, which is the easiest option, they can be grown from seed too, sown indoors or outside. For a good crop, shallot plants must be growing strongly by late spring, as the lengthening days trigger the formation of – the more leaves that plants have at this time, the better the bulbs will be.
Sowing indoors
Sow shallot seeds in late winter in modular trays or small pots. Sow five or six in each module/pot, then thin out to three or four . Each seed will only produce one bulb, so sowing several together will produce a clump. Keep the seedlings in a warm bright place – they can be outside in spring – see Planting below.
Sowing outdoors
Sow shallot seeds outdoors in mid-spring, once the soil is drier and beginning to warm up. Prepare the sowing site as described above. Sow the seeds thinly, in drills 1.5cm (½in) deep, spacing rows about 25cm (10in) apart. Protect the from slugs and snails, especially in damp weather. Thin out the seedlings first to 5cm (2in) apart, then later to 10cm (4in). Closer spacing will result in more and a heavier overall crop, but smaller individual bulbs.
Planting
You can plant shallots either as sets, in spring, autumn or winter, or as young seed-raised plants in spring. They can be planted in the ground or containers.
Planting sets
Sets are usually planted from early to mid-spring. Some varieties can be planted in autumn or even winter – these are less sensitive to cold. Avoid autumn and winter planting in prone to waterlogging, as the are likely to rot. Prepare the ground as explained above, then plant each set so the tip is just showing at the surface. Space them 15–20cm (6–8in) apart, in rows 25–30cm (10–12in) apart. Firm the soil around the sets and water in.
TOP TIP
Birds have a tendency to peck newly planted sets out of the ground, so check regularly and replant any that are displaced. If it happens a lot, consider covering them until well rooted with some re-used fleece or netting.
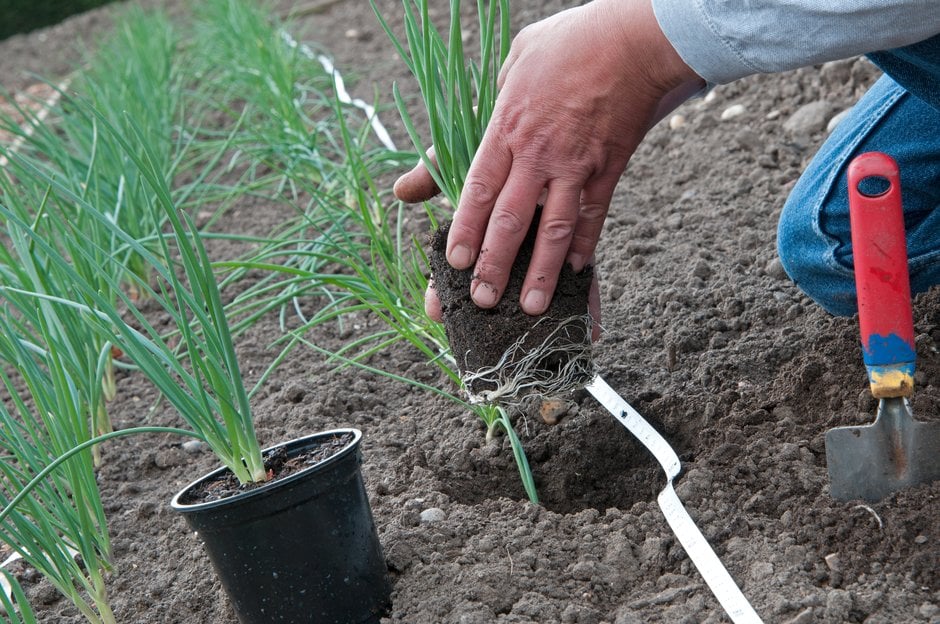
Planting young plants
If you’ve grown your own shallot plants from seed indoors, or bought young plants, they should be planted outside in spring. Harden them off first to acclimatise them to garden conditions. Don’t split up multi-seeded pots/ into single plants – just plant them as they are, to form a clump of . Space the clumps 15–20cm (6–8in) apart, in rows 25–30cm (10–12in) apart. Gently firm the soil around the plants and water well.
Planting in containers
If you don’t have space in the ground or your soil is too damp, shallots can be grown in pots. Use peat-free and a container that’s at least 30cm (1ft) wide and deep. Plant sets and young plants at the depths and spacings described above. Shallots grown in containers need more frequent watering than those grown in the ground.
Plant Care
Watering
Once well rooted in, shallots don’t generally need watering except in prolonged dry spells in early summer or if growing in a container. Avoid watering once the have swollen in mid-summer. Watering spring-planted crops after mid-summer can mean they store less successfully. Also try to avoid wetting the foliage if you do water, as this can encourage fungal diseases.
Feeding
Adding organic matter, such as garden , before planting should provide sufficient for a good crop of shallots. If your soil is poor, you could give an organic-based, nitrogen-rich fertiliser to autumn-planted shallots in late winter. Plants in containers would benefit from occasional feeds with an organic-based general liquid fertiliser, from spring to mid-summer.
Weeding
For a good crop of shallots, it’s important to keep weeds at bay. Shallot leaves cast little shade, so weeds grow readily and will compete for light, water and , leading to a smaller crop of shallots. Weed regularly, and if you use a hoe, be careful not to damage the or foliage.
Removing flowers
Remove any flower stems as soon as they start to form, otherwise the plant’s energy will go into producing the flower, rather than swelling the . It also means the bulbs won’t store well, so at harvest time set aside any that tried to flower and use these first.
Harvesting

Shallots usually ripen in mid- to late summer, depending on the variety, planting time and weather conditions. When the foliage turns yellow and flops over, they are ready for harvesting. Use a hand fork to gently lever the clusters of out of the ground, taking care not to bruise them, as this could lead to rotting in storage. Carefully separate clusters into individual bulbs. The bulbs can either be used straight away or dried and stored for later use.
Storing
Shallots generally store really well, for at least six to eight months. Dry the fully before storing. Lay them out in a single layer on wire racks or slatted trays, so air can circulate beneath. Leave them outdoors in full sun to dry for about two weeks, or in a greenhouse or well-ventilated shed if the weather is damp.
When ready for storing, all the foliage should be dry and papery. Only store perfect, undamaged bulbs. Trim off any remaining dried foliage, then place the bulbs in net bags or trays in a single layer and keep in a light, cool, dry and well-ventilated place. Avoid storing in the dark, as this encourages sprouting.
Problem Solving
Shallots are easy to grow and relatively trouble free, although they can be affected by various fungal diseases, especially in damp growing conditions or if poorly stored. Flowering ( ), triggered by low temperatures in spring, means won’t store well. Birds may pull up newly planted shallot sets, so protect them with netting or biodegradable fleece until rooted in. See below for other common problems.
Common Problems

Bolting in vegetables
Bolting is the term applied to vegetable crops when they prematurely run to seed, usually making them unusable. A cold spell or changes in day length...

Allium leaf miner
Allium leaf mining fly was first detected in Britain in 2002, it has become widespread in England and parts of Wales. The larvae bore into the stems a...


