Getting Started
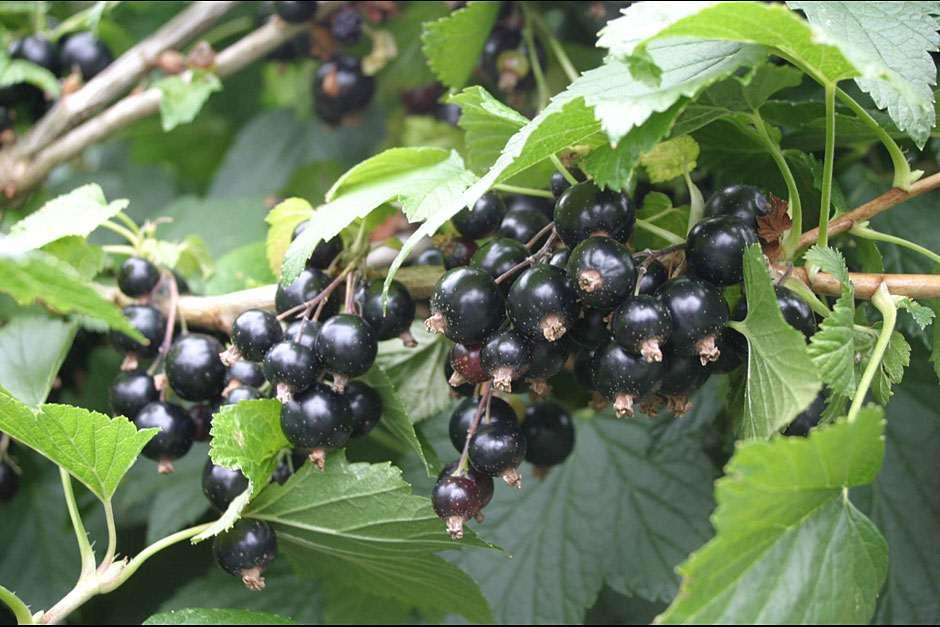
Blackcurrants are easy to grow, producing a delicious summer harvest with little upkeep required. These shrubs usually grow to about 1.5m (5ft) tall and wide, with 6–10 upright stems arising from the base. More compact varieties can be grown in a large container, at least for a few years, although they’ll fare better in the ground. Another space-saving option is to buy a standard-trained blackcurrant, on a single, tall stem.
Blackcurrants like a sunny spot, but will tolerate a little shade. They’re generally robust, healthy and trouble free, and once established need little attention apart from pruning annually in winter, which is a quick and simple process that will keep them cropping well for many years.
Jobs to do now
Water in dry spells
Harvest
Month by Month
Plant
Harvest


Choosing What To Grow
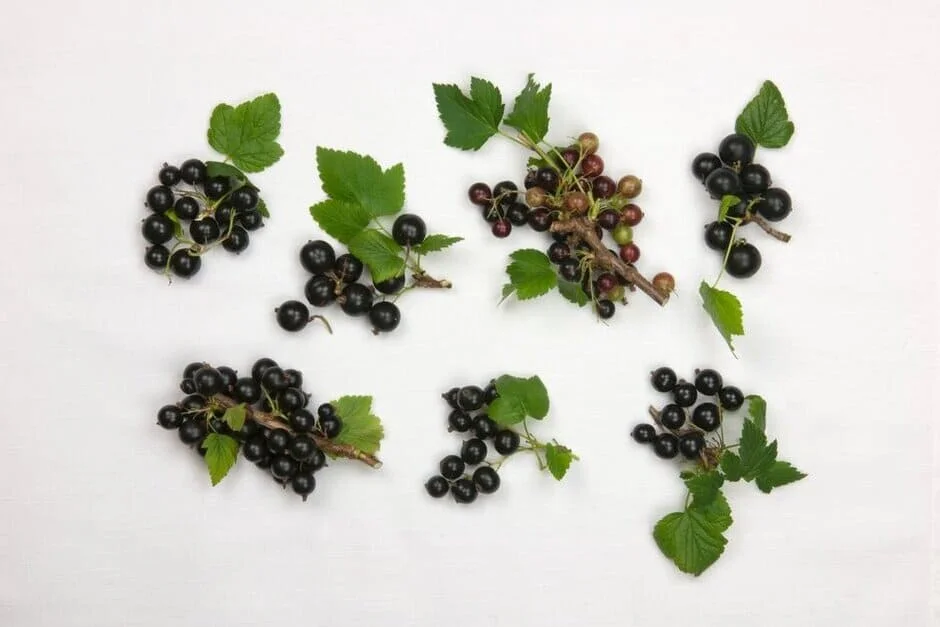
There are many excellent blackcurrant varieties to choose from. Modern varieties have been bred to flower later, so are a better choice in cold locations, as frost at flowering time can lead to poor fruiting. Their currants are often larger too, and many are resistant to problems such as mildew and big bud mite. Modern varieties such as ‘Ben Connan’, ‘Ben Hope’ and ‘Big Ben’ also have the advantage that most of the currants in a cluster ripen at the same time, so you can simply pick the whole bunch. With older varieties, individual currants usually ripen at different times, so must be picked singly, which is more fiddly and time-consuming.
If you have space to grow several plants, select varieties that fruit from early to late season, to provide harvests for most of the summer. Look in particular for varieties with an RHS Award of Garden Merit (AGM), which shows they performed well in trials, so should crop reliably – see ourlist of AGM fruit and veg (135kB pdf) and our Recommended Varieties below. You will also find blackcurrants growing in the fruit areas of the RHS gardens, so do visit to compare varieties and pick up growing tips.
What and where to buy
Blackcurrants are usually sold as two-year-old plants, either bare root or in pots. plants tend to be cheaper, but are usually only available from specialist suppliers, and for a limited period, from October to March. Container-grown plants are more widely available, in garden centres and online, all year round. Always buy good quality plants that are certified virus-free – look for ‘FPCS-certified’ on the label.
Recommended Varieties

'Ben Sarek'
Compact variety with good frost resistance. Heavy crops of large fruits on short strigs

‘Ben Connan’ AGM
Large, tasty berries. Compact plants, resistant to mildew, frost and gall midge.

‘Big Ben' AGM
A recent introduction with very large fruit. Compact plant, ideal for small gardens.
Preparing The Ground
Blackcurrants prefer well-drained but moisture-retentive soil, although they will cope in most other soil conditions. They fruit best in full sun, but will still do well in light shade. Avoid sites prone to cold winds or late frosts, which can damage the flowers and reduce the crop. Consider planting inside a fruit cage to protect your crop from birds.
No soil preparation is generally needed before planting. However, if your soil is light or poor, dig a bucketful of organic matter, such as garden compost or well-rotted manure, into the soil you remove from your planting hole and use this to backfill after planting. This minimises soil disturbance and helps your plant get off to a strong start.
Planting
Blackcurrants are quick and easy to plant, whether they are bought or in a pot. The best time to plant both types is during the dormant season, from late October to March, although avoid periods when the soil is very wet or frozen. Unlike bare-root plants, those bought in containers can be planted all year round, although if you plant in spring or summer, take extra care to keep them well-watered during prolonged dry spells.
Planting in the ground
Dig a hole at least twice the diameter of the and spread the roots out. Plant both container-grown and plants 5cm (2in) deeper than previously growing – look for the soil mark on the stem or use the top of the potting as a guide. Deeper planting encourages strong shoot development from the base.
Plant standard-trained plants at the same depth as previously grown and provide them with a sturdy tree stake reaching to just below the head of branches.
Firm the plants in well to get rid of any air pockets around the roots, then water thoroughly. Space plants 1.5–1.8m (5–6ft) apart, using the wider spacing for vigorous cultivars. Lay a thick mulch of garden compost or well-rotted manure over the surrounding soil, to help retain moisture and deter weed growth.
Blackcurrants should be pruned straight after planting – see Pruning and training, below.
Planting in a container
Blackcurrants generally don’t perform well in pots long term, due to their size and vigour. But if you’re short on space, they should be fine for a few years, especially more compact varieties such as ‘Ben Sarek’ and ‘Ben Gairn’.
Choose a pot that’s at least 45cm (18in) wide and deep and fill with a good quality, such as peat-free John Innes No. 3.
Plant Care
Established blackcurrant plants need little maintenance apart from annual pruning and mulching. To safeguard your crop, it is also a good idea to protect ripening fruit from birds.
Watering
Water newly planted blackcurrants regularly during dry spells in their first couple of years. Once established, those growing in the ground shouldn't need any routine watering.
Blackcurrants growing in containers need a steady supply of moisture throughout the , so water regularly in dry spells, aiming to keep the evenly moist. Avoid heavy watering when the fruits are ripening, as this can cause the skins to split.
Water early in the morning or in the evening to minimise moisture loss from the soil, ideally using stored rainwater.
Mulching
blackcurrants growing in the ground each spring, spreading a thick layer of mulch, such as garden or well-rotted manure, on the soil around the base of the bushes. This helps to hold moisture in the soil and suppress weeds. Just make sure to leave a small mulch-free circle immediately around the base of the stems, to prevent them rotting.
Feeding
Blackcurrants growing in regularly mulched soil shouldn't need any additional feeding. However, if harvests are poor or your plant is showing signs of nutrient deficiency, apply a granular fertiliser to the soil in early spring. Use our page on nutrient deficiencies to work out what is lacking and apply the recommended feed, following instructions on the packet.
Plants growing in containers benefit from regular feeding. Either apply an organic, high potassium liquid fertiliser every fortnight during the , or sprinkle a handful of a granular, general purpose fertiliser onto the each spring.
Repotting
Container-grown blackcurrants need repotting every few years into a larger container of peat-free compost – this is best done in spring. Once it becomes impractical to move the plant into a larger pot, repot into the same one, removing and replacing any loose and lightly trimming the roots. In the years between repotting, topdress by removing the top layer of compost and replacing with fresh.
Blackcurrants don't generally grow well in pots long-term, even with regular repotting. Once they start to fruit poorly, transplant them into the ground.
Protecting
Protecting flowers from frost
If frost is forecast while blackcurrants are in flower, cover bushes overnight with or hessian, raised up on canes, then remove it in the morning to allow pollinators access to the flowers.
Protecting fruit from birds
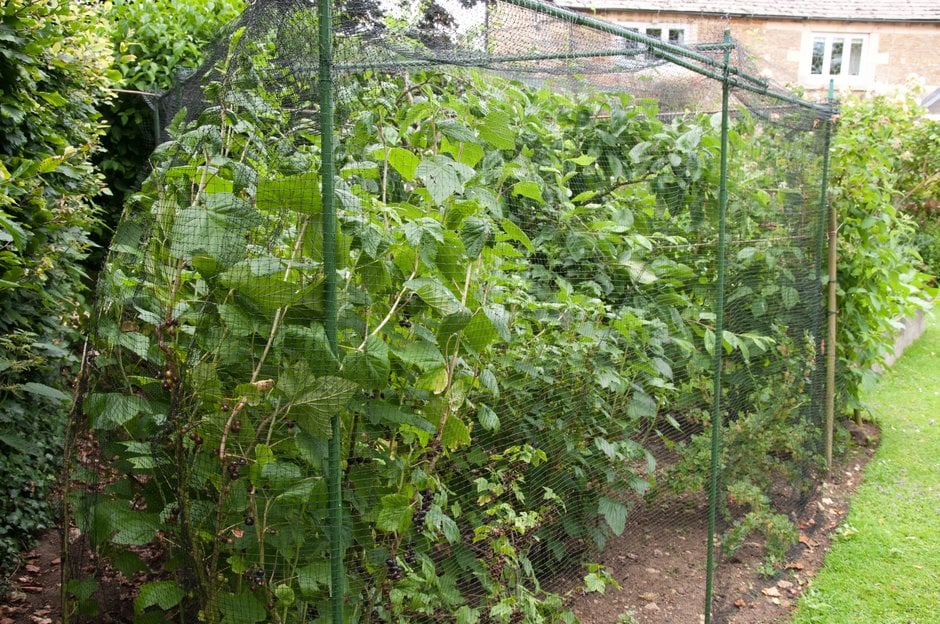
Cover blackcurrant bushes with plastic-free or reused netting before fruit starts to ripen, to prevent it getting eaten by garden birds. Make sure the netting is taut, so birds don’t get tangled in it. Alternatively, build a temporary or permanent fruit cage.
Propagating
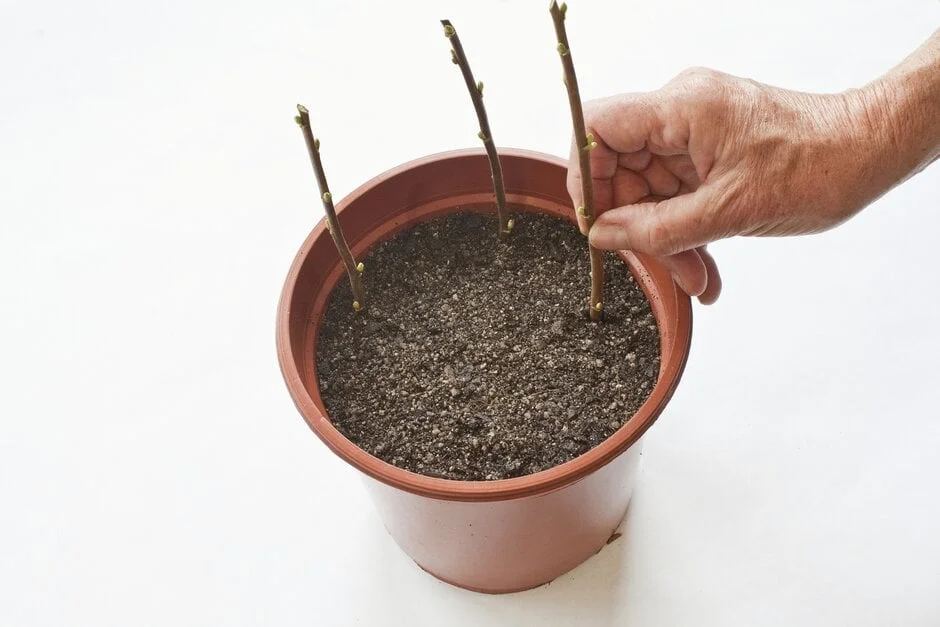
You can make new blackcurrant plants from taken from young, ideally newly planted, virus-free plants from mid-autumn to winter. The should be about 20cm (8in) long and can be inserted into pots or directly into the ground.
Taking cuttings from older plants is not recommended, as they may have virusesthat will reduce the vigour of any plants propagated from them.
Pruning And Training
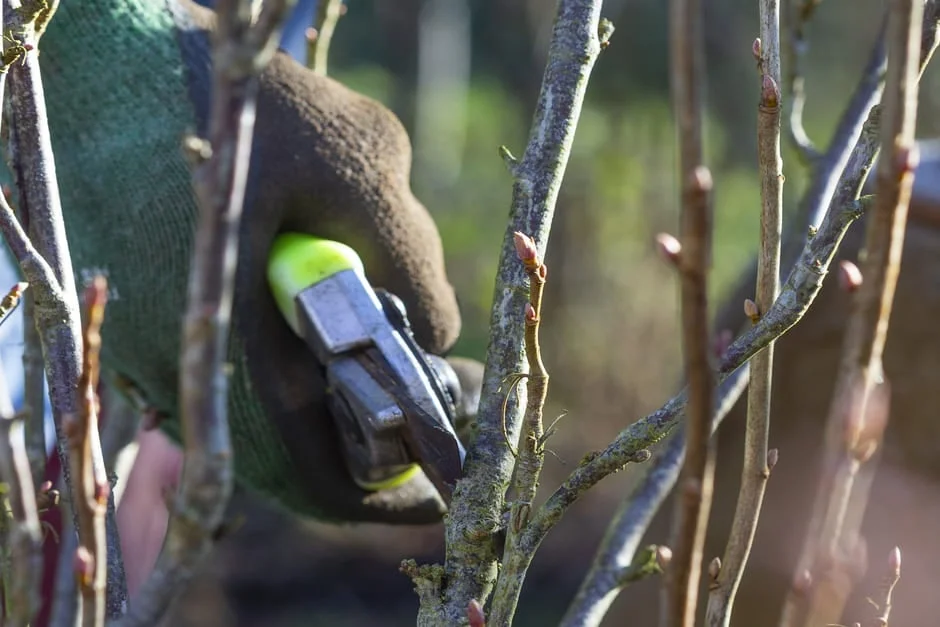
Blackcurrants fruit best on strong, young growth made in the previous few years, so the aim of pruning is to remove some of the oldest, least productive stems each year and encourage new ones to sprout from the base. Done annually, this will create a constant supply of new stems, for maximum harvests. Blackcurrants are usually grown as multi-stemmed bushes, with an open structure of 6–10 upright stems growing from the base.
Established bushes (aged four years or older) are best pruned every winter to keep them fruiting strongly. This is a simple process – cut out up to a third of the oldest stems down to the base. These are easy to distinguish, as they are darker in colour and thicker, usually requiring loppers or a pruning saw to cut them cleanly. Cut just above an outward-facing , if you can see one. The new shoots produced in response to this pruning will fruit well for several years, until they in turn become less productive and should be removed.
Follow the same principles when pruning standard blackcurrant bushes, pruning annually to encourage young fruiting wood. At the same time shorten any very long or staggly branches to maintain a well-shaped crown. Remove any weak, crossing or downward-growing branches, and any shoots growing directly from the main stem below the crown.
Younger blackcurrant bushes need slightly different treatment:
- Newly bought blackcurrants – if planted while dormant (from autumn to early spring), prune straight after planting by cutting all the stems down to one or two buds above ground level. This may seem drastic and means you won’t get fruit in the first year, but it will encourage new shoots to be produced from buds below soil level (see Planting section)
- In the first three years after planting – if growth is strong, give young blackcurrant bushes just a light prune in autumn or winter to remove any weak or low-lying shoots. But if growth is weak, prune hard, cutting at least half the shoots down to the base, to stimulate more new stems to grow
Harvesting
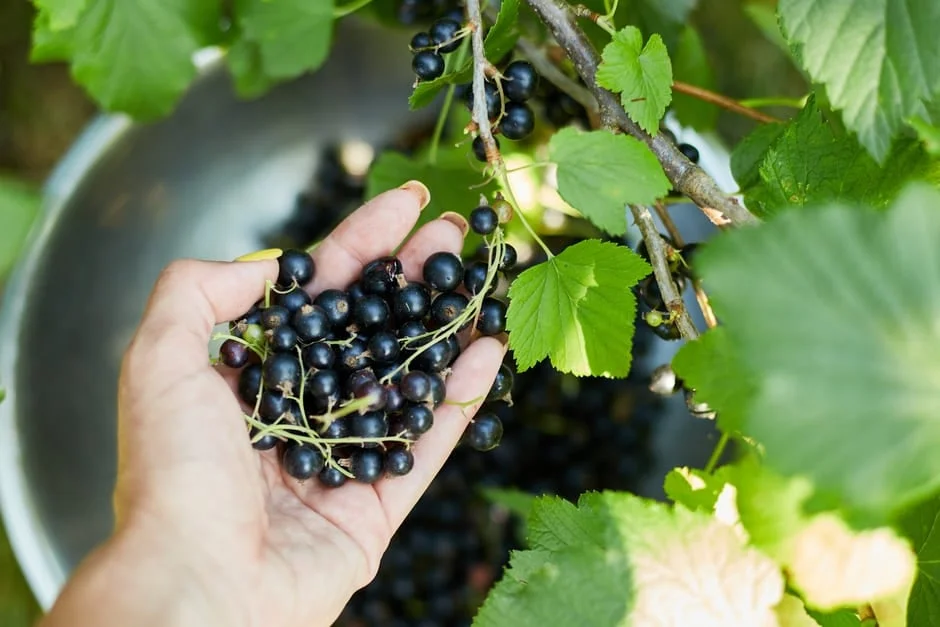
Blackcurrants ripen from midsummer onwards, depending on the variety. With modern varieties, such as ‘Ben Connan’, ‘Ben Hope’ and ‘Big Ben’, the whole bunch of currants (also known as a strig) ripens at the same time, so simply cut it off once the currants turn black. You can then remove them from the stems in the kitchen.
Older varieties ripen less uniformly, with currants at the top of the bunch ready first. In this case, pick ripe currants individually. Handle them gently, as they’re easily squashed and the juice can stain your fingers.
An established bush should produce a harvest of about 4.5kg (10lb) of currants. Eat within a few days of harvesting, keeping in the fridge if necessary. Alternatively, blackcurrants can be frozen, raw or cooked, or made into preserves.
Problem Solving
Blackcurrant plants are generally healthy and problem free, but can occasionally develop viruses or mildew that affect their vigour, or suffer damage from insects. Fortunately many modern varieties are resistant. However, as with most fruit crops, the main problem is birds, which will devour the ripening currants unless they’re protected with netting.
Common Problems

Blackcurrant big bud mite
The vigour and cropping potential of blackcurrants can be reduced by large populations of big bud mite.

Blackcurrant gall midge
Blackcurrant gall midge can cause the leaves of blackcurrants to become distorted and crumpled.

Currant and gooseberry leaf spot
This is a fungal disease that attacks the foliage of currants (black, red and white) and gooseberries in summer, and can be troublesome in some season...


